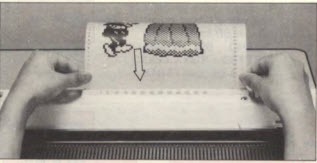
decorative-patterning-with-knitting-machines
Machine Knitting Techniques

Decorative Patterning with Knitting Machines

  • January 11, 2022
  • 0 comments
The secret for success with knitting in pattern on your machine is UNDERSTANDING your machine.

Practice the techniques and learn to add stitch patterns to your knitting patterns for unique, creative knitwear

Decorative Patterning with Knitting Machines


With so many makes and models of knitting machines in use, it can be confusing when reading some of the vintage patterns and publications that you may find.

Let's explore some of the methods of creating stitch patterns on various machines

Besides knitting speed, what draws many knitters to knitting machines
is being able to quickly and easily create lace, textured patterns, and designs.


The key to decorative, automatic patterning:

What enables the carriage to "automatically" pick up the needles necessary to produce your design?
  • Punch cards
  • Mylar sheets
  • Passap electronic console
  • Electronics in Japanese machines
  • PLUS the dial selections necessary for each technique

Depending on your machine, with the correct punch card, mylar sheet, or program setting on an electronic console, you can knit true Fair Isle, tuck stitch, tuck lace, slip stitch, knitweave, and, for the punch card readers, punch lace.

Most of these techniques can also be worked on a manual machine by hand-selecting needles and hand-manipulating stitches.


1 Where to Begin?

By Katharine Seaman Used with permission

It is possible to start with a basic, single-bed machine and add attachments to it as you progress in your enjoyment of producing lovely knitted fabric and garments.

But what if you want to be “hands on”? That, too, is possible and sometimes preferable. But you need to understand what is possible on with YOUR machine

Your Manual Is Important!
Your manual is important in setting up your machine to add a decorative pattern or picture.
  • Each brand has its own combination of lever settings or entries into the electronic memory, and sometimes there is a combination of both.
  • The cards not only have to be filled out or punched correctly but they must also be fed into the reader correctly.
  • If you are missing a manual, most are downloadable here at no cost.

2 About Punchcards

Punch cards, when inserted into the punch card reader, are read by little feelers. If the feelers find a hole punched out of the card, they enter the hole and the corresponding needle is moved into working position.

This, along with the carriage settings create stitch patterns

  • If you are working with a punch card machine, you can augment the cards that come with the machine by purchasing some blank cards and a punch. Or you can buy a roll of punch cards and cut to the length that you need
  • You can also find books of punch card designs, or you can create your own design. (Check your manual for your machine for the correct way to mark the cards.)
  • If you have created a design that is longer than one punch card, you can carry the design onto a second card.
  • The cards have pinholes in the center of the squares, and the punch has a centering pin so that the holes will be properly centered in each square.
  • It is a good idea to mark with a pencil the squares that you want to punch out before you begin.
For a two- color design such as Fair Isle, the holes in the card will knit in the secondary color, and the blanks will knit in the main color.

3 Mylar Readers

  • If your machine uses a mylar sheet reader, you can also purchase these pre-marked, or you can mark your own. You should lightly mark in the design before you fill the spaces in completely.
  • In the case of the mylar sheet, the squares that are marked are the equivalent of the ones that are punched for the punch card machines.
  • Mylar sheets, when fed through their reader, have the blacked-out squares read electronically, signaling which needle should be placed in working position.

4 Electronic Machines

The electronic machines have many patterns and motifs pre-programmed into the computer’s memory and should come with a book of designs, pictured both as knit and in chart form. There are alphabets, figures, animals, cars, and other designs in their console memories; and you will find that it is hard choosing just one, almost like going to the yarn shop.

Single motifs can be placed in the location that you choose and, like the patterns, can be rotated and combined. These patterns can be combined to create interesting “new” designs: they can be rotated, flipped, reversed, or placed anywhere you choose in your project.

Passap Machines
  • The Passap Manual provides detailed instructions for adding original designs to the console memory.
  • The Passap’s design book shows the designs knitted in several different combinations, any special instructions that are needed when entering the pattern, and the pattern charts which show (with black and white squares) the pattern as well as the pattern stitch dimensions
  • The patterns are selected on the machine’s console which, like the mylar sheet reader, then electronically signals which needle should be placed in working position.
  • For the Passap, a heavy card is marked with a dark pen, then inserted behind a plastic sheet and fed through the reader.
  • It is also suggested to lightly mark the card that will be fed into the Passap reader.
  • It is possible to make quite a large design in this manner, as you can feed sections of a design into the reader.
  • The reader is very exacting, and it does require a steady hand and good eyesight to produce the desired result.
5 Stitch World Books

One extremely valuable resource for machine knitters are the Brother Stitch World Books. These were included with the various Brother (Knit King) electronic machines.

They display a treasure-trove of stitch patterns that can be the source of inspiration for any knitting machine.

Download your free copy

6 Hand Manipulating Stitches on the Knitting Machine

There are patterns and designs that do not fit into the programmable category but that all knitters want to be able to produce. These include:
  • Cables
  • Transfer laces
  • Bobbles
  • Twisted stitches
  • Short-row pin tucks
  • And more
These patterns can be created by hand, transferring stitches from one needle to another.

Tools that can assist you in this process include transfer tools available in different configurations, garter bars, needle pushers, and capped stitch holders.

The stitch holders and garter bars come in different lengths.


Cables
Cables are created on knitting machines much the same as they are in hand knitting.

Stitches are taken off their needles and moved either in front of or behind other stitches. You do need two transfer tools to accomplish this maneuver. You also must be careful that you are not putting too much strain on the needles as they can be bent, and the stitches may be too tight to knit off easily on the next carriage pass.

You can have a combination of different cables on a garment, as in hand knitting.

Be sure to make gauge swatches of your different cables to ensure the correct sizing of your garment.

Cables on the Machine

The secret for success with knitting in pattern on your machine is UNDERSTANDING your machine.

Practice the techniques and learn to add stitch patterns to your knitting patterns for unique, creative knitwear


0 Comments
Add your comments
comments are added at knititnow.com